Garage sales are awesome places to find amazing deals. If you don't feel like driving all over town, just take a walk in the neighborhood and hit the ones close by. Today's find: a cute little bench for.. wait.. $2.50! Can you believe that?! Furniture is usually priced higher at rummage sales, but I guess these people just wanted it gone.
It was pretty rough looking, but I saw potential. My immediate plan was to re-upholster and paint it. I have upholstered two headboards for my home, so this little mini cushion was pretty simple, anyone can do it! I might put my headboards up on a later date and share the website I found my instructions from.
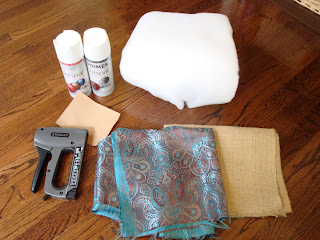
Materials
Non-stretch fabric for covering
Batting
Sand Paper
Primer
Paint (spray or regular, your choice)
Staple Gun
Hammer/Screwdriver
Prepping
1. I unscrewed and detached the seat. I then noticed there were a couple layers of fabric and burlap that were held on by little brad nails. The fabric was pretty wimpy so I was able to pull most off by hand, then use my hammer to pull up as many nails as possible.
2. I ended up having to do some jimmy work with one of the broken springs. A bonus of buying an old house; tons of weird tool/metal items in the basement. I have no idea what these silver things are I found, but they worked to hold the broken spring!
Upholstering
1. I bought more burlap, which seemed to be used over the springs so they would not pinch the batting.
2. Staple the new burlap on the springs.
4. Staple the four sides and continue, alternating and holding taught the sides of the batting.
5. Place your fabric right side down on the floor and put the cushion upside down. Repeat same process by stapling and folding corners.
Painting
1. Start by sanding the stand with a not-too-gritty paper. I have no idea what one I used, but it worked. You really need to do this if there is shiny or slick surface, otherwise the paint will not stick well.
2. Use primer! Especially if you plan on using a light color like I did. Otherwise, it will take way too many coats of paint to cover. Here is how the coat of primer turned out:
3. Paint! If using spray paint, you'll probably need 2-3 coats. Make sure to let it dry in between coats so you don't get any nasty runny stuff or bubbles. If using a brush, I would suspect 2 coats would be the most you needs, just make sure to tame any drips before they dry.
4. Let dry completely and re-assemble. Ta-Da!
Total cost:
$2.50 Bench
$3.50 Fabric (w/ extra left over)
$1.50 Burlap (w/ extra left over)
$3.50 Primer
$3.50 Paint
$ .00 Batting (left over from other project)
$14.50
Hello, can't beat that! I really think a bench like this would go for at least $70.00 at a boutique! Make your own and customize it how you want!
I chose a pretty shinny/exotic fabric. Most of the fabric and patterns in my house are earth tones. I wanted something that would pop, and since it's so small it dosen't look gaudy. The pictures don't do it justice, but it actually changes color depending on the angle you are viewing it from, so pretty! I suggest trying something new, you can always spend a few more dollars and change it up when you get tired of the current fabric, just staple another layer on!


I want one! This blog is so cute :) love youu
ReplyDelete