Monday, December 5, 2011

Hanging Hemp Lamp


Moral of this DIY: taking a photograph of a light is extremely difficult, and almost impossible to document the true ambiance of the piece! 

This project was inspired by this West Elm light, and I am not the first person to blog about it! From the research I have been doing, this airy light cost around $80! holy moly, not here, hunny!

This took me about 3 hours in total (not including dry time), which is not that bad considering the cost saving and the pride of constructing a useful home item!  
What would look really nice also, is a grouping of these lights in different sizes.. maybe down the road..

Here's the breakdown of the cost:

Light kit from IKEA:                 9.99
Large Ball (16in Diameter)       3.99
800 Feet 20lb Hemp Cord        6.00  (Coupons from Joannes!)
1 bottle Clear Tacky Glue        2.50
Drop Cloth                                  0
Rubber Gloves                             0 
Total:                                   $22.50
Instructions
Prepare. Layout some type of drop cloth. Squirt glue into container. Put on rubber gloves (I'm not afraid of a mess, I went without for the sake of ease). Open all packages. 

Trace the largest part of your light kit shade (or just make a circle if using a bulb kit only) onto the ball.
Wrap it up! This is the messy part, and bloggers had different opinions about what works best. My method was this: grab some glue with one hand, run it along about 12 inches of hemp, place it on ball. Wrap, Repeat. Avoid circle! Do not cut the string, just keep pulling if off the spool.

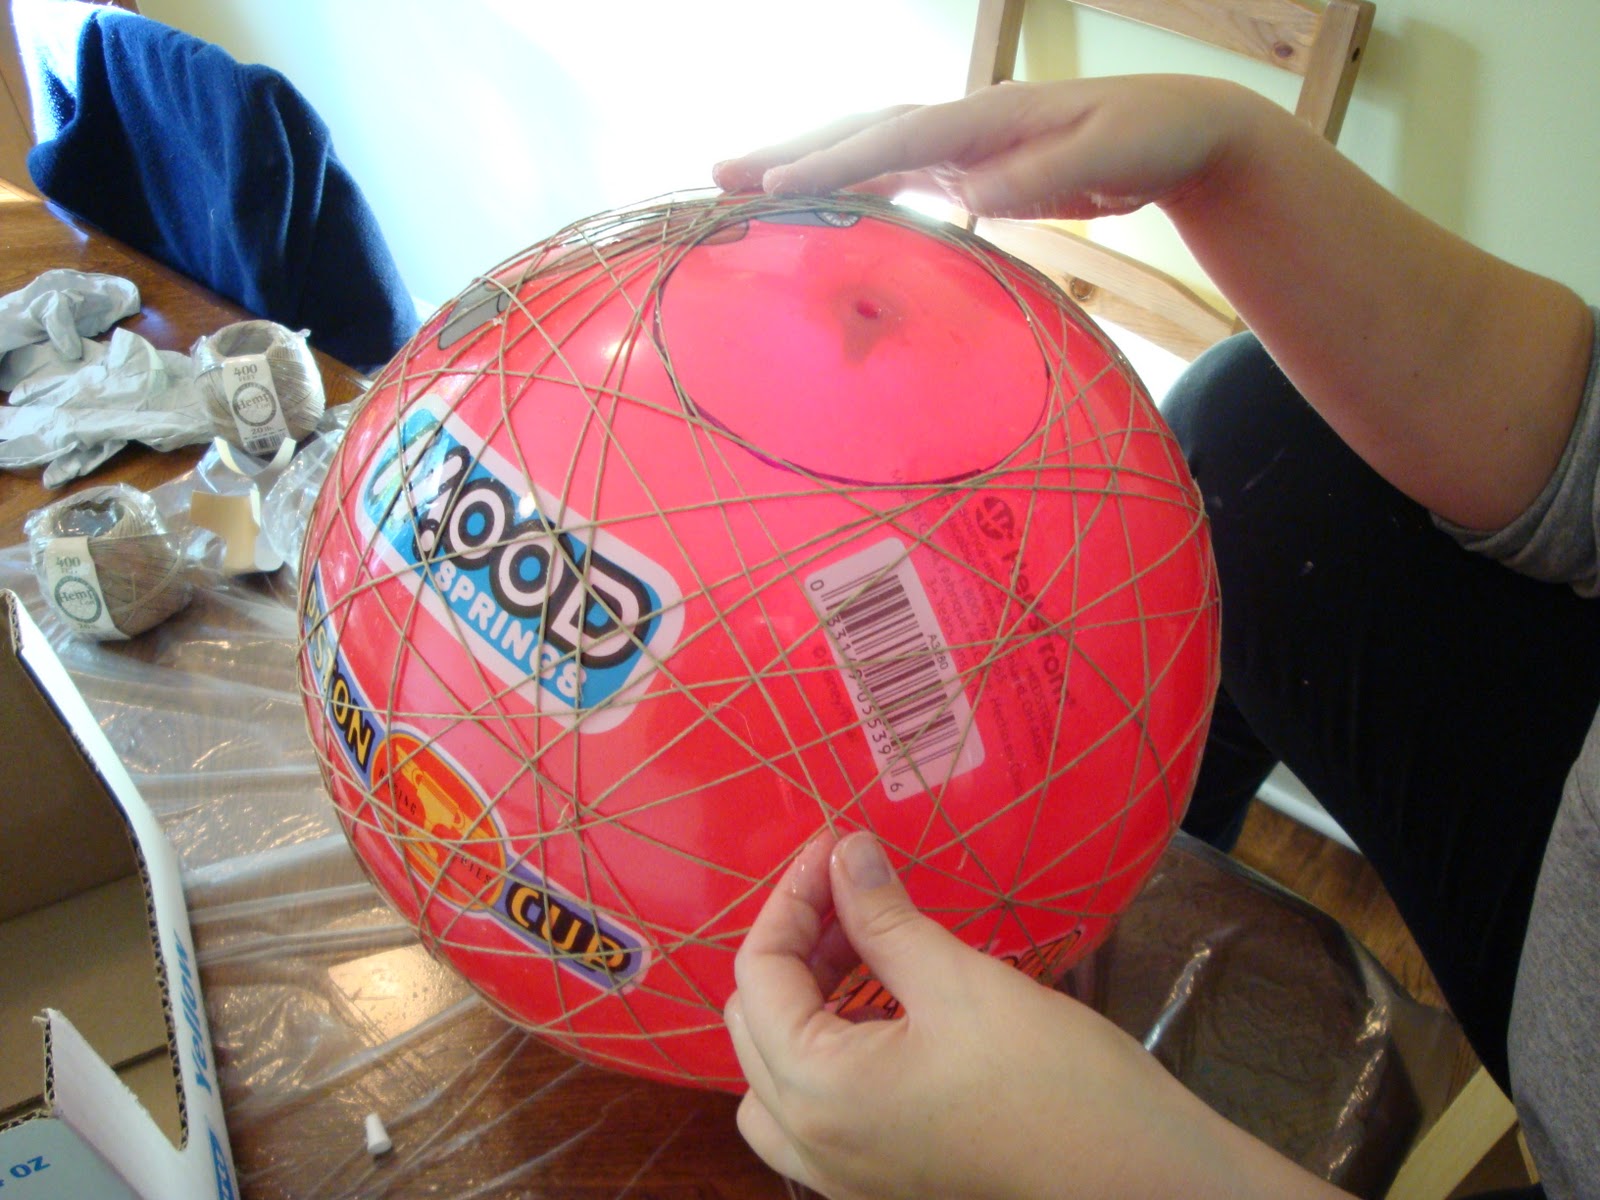
And some more wrapping...


It's up to you how dense you want it. I still wanted a lot of light to come through so I stopped after 800 ft of string. 

This is what took the most time, about an hour for each spool of hemp. And my back hurt, bad. So there was a lot of switching position to find what worked best. 

After you are done wrapping LET IT DRY. I let it dry for about 18 hrs, but it will depend on the humidity and how much glue you applied. 

Time to take out the ball. My 7 year old cousin would be appalled at the sight of deflating his favorite cartoon. So, don't let the kids see, or get a hold of the ball and try to bounce your lampshade! 

  
I just used a pin and punctured the ball, I supposed you could use a basketball pin to deflate, then inflate again for future use. To me, it wasn't worth it.

It will slowly pull away and should remain intact if you let it dry long enough. 


Now, just assemble the light kite inside, with the hole at the bottom. Hang, and ENJOY!

Note: There will be clear glue still on shade. I tried to punch some of it out, but it was just too hard. You can't really see it unless you look at it super close, and really, it doesn't distract from the lamp. 

Again, NOT easy to take pictures of a light - at least with my cheapy cam. (hint hint hubby)

I also love the shapes that it creates on the wall. 


Tuesday, July 5, 2011

Anniversary Banner


My parents 30th wedding anniversary is right around the corner. Trying to think thrifty, I started brainstorming some decorations that I could make with materials I already owned. Two bloggers inspired this one, the famous Young House Love, and a super crafty high school classmate/teammate Delicious Paper Design. There are many great artists doing this super cute banners, so I thought I'd give it a  try.

Note: I didn't have a wall in my house long enough to display it properly, I'll have to wait for the party to take a picture where my parents have a large wall perfect for my length!


Instructions:

1. For those already familiar with the crafting field, look around your (what I assume is large, like mine) collection of miscellaneous craft paper. It just so happens that the same pack of craft paper I used for my wedding invites had the color theme my mom picked out, greens and blues. This pack was on clearance for $5 over three year ago. It just keeps on giving, not only did I make about 120 wedding invites (invitations, info, reply cards, map) out of it, but also the wedding programs, signage, miscellaneous decorations, and now this banner. And it's still not empty!


2. The paper is 12in x 12in. One sheet allowed me four 6in x 6in squares. With the amount of letters (16), that worked out to only 4 sheets of the background diamonds. I chose two different colors to alternate. I used my cutter to get exact measurements. I choose diamonds (squares) because this was my frist time and seemed the easiest measurement-wise. For those of you with Cricuts, the possibilites are endless!


3. After I cut 16 squares for the background, I looked through my paper pack and found two patterns that would look nice with the colors already chosen. I also cut those into 16 squares to help with letters later. 


4. This is the step I forgot to document with my camera, sometimes us crafters just get on a roll and forget to stop! 

   Lettering:
1. Spell out all words on a scrap paper first, ya never know! 
2. If you don't feel confident free-handing the letters, there are many stencils available online to print out.
3. Lay out your paper as you will be cutting them, especially if you are alternating patterns/colors. 
4. I suggesting flipping the paper over and sketching the letter on the back, BACKWARDS. If this seems difficult, draw it normally on some looseleaf and attach it to your paper with a paperclip and cut through both. 
5. When you have a duplicate letter (ex. three a's), stack your craft paper and clip together before cutting.
6. Continue on, but be diligent about checking your alternating colors so you don't mess up. In my case, I didn't have any extra paper so it was not an option! 
7. Use a hole punch to create the space for the ribbon. (A cool shape would be sweet!)


5. Gluing letters: I'm sure there are many great craft glues out there, but as an Art Teacher (well, an unemployed one as of late), Rubber Cement is the best economic option for glueing PAPER TO PAPER. It is not water soluble so unlike white glue, it doesn't leave your paper all wrinkly, AND it dries clear and can be rolled off when it dries. Another advantage is that is is reposition-able, so if you can play around with your layout before it completely dries. 

Housekeeping tip: Use an old magazine for your glue station. Once a page becomes gluey, flip to the next to ensure rubber cement doesn't make its way everywhere!


6. After glueing all the letters I added a little bling with some cheapy glue on rhinestones. I plan to hang this outside (weather permitting) and I hope it catches the sun. 


7. One again, layout your letters and any extra elements you have to add to the banner. I added a green heart in between the two words. Another preparation tip: cut all your tape pieces ahead of time. 


8. Pull out more than enough ribbon for your letters, and string on your last letter, first. 


9. Pull the ribbon through and leave a long tail for hanging. To keep equal distance between letters, find something to measure on, or use a ruler. I used two lines on my table. Once they are lined up, flip and tape in place. 


10. Continues with all your letters (check spelling along the way!), and ta-da! A home-made banner!


This project was super cheap. The only additional expenses I had was the rubber cement, ribbon, and rhinestones. Those came to around $8.00, but I did not use them all. In fact, I plan to make some more hanging decorations with "30" on them and use some more of my materials. I will update with pictures from the event in a few weeks to see the banner stretched to its full potential! 

Happy Crafting! 


Wednesday, June 15, 2011

Re-Use Art Work


This is a quick project that I did last summer while we were updating our house.

Side note: I realize that I need to get a new camera to capture my projects better, but that isn't in the budget right now!

Gwen Frostic was a Michigan artist and poet who specialized in wood block prints. I learned about her in college, then one day my mom pulled out a stack of postcards she had purchased when she was younger. They were Gwen Frostic prints! So beautiful, simple and organic. They fit perfectly into the feel of my home.


All of the picture frames were purchased from the Salvation Army. They were all different colors, and I specifically looked for ones with interesting shapes and textures.


Sorry, I do not have any step-by-steps for this one, but it is pretty simple to do.

First, I cleaned all the frames and sanded any shiny or rough ones.

I LOVE SPRAY PAINT! I decided on a shiny black- spray away!

I loved this tiny frame, but I didn't want to cut any of the prints to fit. I found a piece of scrap-booking paper that was in my drawer and had the same vibe.


Project Cost:
Frames: 6 @ ~ $2.00
Paints:              $3.00
Prints:               Free!
Total:               $15.00


I am going camping for a few days, so my next project won't be posted for a little while. I am working on a set of placemats using stenciling and weaving, that's the plan!

Thursday, June 9, 2011

Garage Sale Deal - Cute Bench Makeover


Garage sales are awesome places to find amazing deals. If you don't feel like driving all over town, just take a walk in the neighborhood and hit the ones close by. Today's find: a cute little bench for.. wait.. $2.50! Can you believe that?! Furniture is usually priced higher at rummage sales, but I guess these people just wanted it gone.

It was pretty rough looking, but I saw potential. My immediate plan was to re-upholster and paint it. I have upholstered two headboards for my home, so this little mini cushion was pretty simple, anyone can do it! I might put my headboards up on a later date and share the website I found my instructions from.


Materials
Non-stretch fabric for covering
Batting
Sand Paper
Primer
Paint (spray or regular, your choice)
Staple Gun
Hammer/Screwdriver


Prepping

1. I unscrewed and detached the seat. I then noticed there were a couple layers of fabric and burlap that were held on by little brad nails. The fabric was pretty wimpy so I was able to pull most off by hand, then use my hammer to pull up as many nails as possible.

2. I ended up having to do some jimmy work with one of the broken springs. A bonus of buying an old house; tons of weird tool/metal items in the basement. I have no idea what these silver things are I found, but they worked to hold the broken spring!


Upholstering


1. I bought more burlap, which seemed to be used over the springs so they would not pinch the batting.

2. Staple the new burlap on the springs.


3. I placed two layers of batting cut to size on top to give my cushion fluff, but not add girth around the edges.  After, I flipped it on top of two layers that were cut bigger than the seat. Depending on the thickness of batting you use the number of layers will change.


4. Staple the four sides and continue, alternating and holding taught the sides of the batting. 


5. Place your fabric right side down on the floor and put the cushion upside down. Repeat same process by stapling and folding corners.


Painting

1. Start by sanding the stand with a not-too-gritty paper. I have no idea what one I used, but it worked. You really need to do this if there is shiny or slick surface, otherwise the paint will not stick well.


2. Use primer! Especially if you plan on using a light color like I did. Otherwise, it will take way too many coats of paint to cover. Here is how the coat of primer turned out:


3. Paint! If using spray paint, you'll probably need 2-3 coats. Make sure to let it dry in between coats so you don't get any nasty runny stuff or bubbles. If using a brush, I would suspect 2 coats would be the most you needs, just make sure to tame any drips before they dry.

4. Let dry completely and re-assemble. Ta-Da! 

Total cost:
                   $2.50 Bench
                   $3.50 Fabric (w/ extra left over)
                   $1.50 Burlap (w/ extra left over)
                   $3.50 Primer
                   $3.50 Paint
                   $  .00 Batting (left over from other project)
                   $14.50

Hello, can't beat that! I really think a bench like this would go for at least $70.00 at a boutique! Make your own and customize it how you want! 


I chose a pretty shinny/exotic fabric. Most of the fabric and patterns in my house are earth tones. I wanted something that would pop, and since it's so small it dosen't look gaudy. The pictures don't do it justice, but it actually changes color depending on the angle you are viewing it from, so pretty!  I suggest trying something new, you can always spend a few more dollars and change it up when you get tired of the current fabric, just staple another layer on!