Tuesday, January 1, 2013

Custom Double Desk


Problem: Two teachers who need workspace in a limited amount of space.

Solution: Build a double desk!

Our "master suite" houses our bedroom and an extra area that we have turned into our office. We customized our desk to fit perfectly into our nook.

While pursing one of my favorite blogs, YHL, I saw this amazing workspace. It's large and roomy. However, we don't have a large-roomy place. So we modified.

I don't have step by steps of this project, because we basically modified our farmhouse table into a desk, and added a few conveniences for the tech-hubby.

Note: the color in the images is way brighter than what it is in person. In person it's more Creamsicle, then hazard-wear orange.


We added a snazzy lattice trim around the edge to give it pizazz! We also created a custom spot in the middle to perfectly fit a file cabinet. That was probably the trickiest part.

Finding chairs that matched were quite a suprise! I was sure we were bound to ugly black desk shares. Stumbled across the pair in the clearance section at IKEA. One was a little dirty, but they both cleaned up nicely and are super-duper cute.

This image shows the color a little better. I know it looks drastic, but it contrast with the blue walls, and once covered up with our working supplies, looks great!


Hubs added the monitor shelf, and also (not pictured) electronic cord management holes.
We also used L-brackets to attach the legs, because this sucker is not coming down the stairs in once piece if we ever leave our first home.


So, ta-da! We are very happy with it. Hope everyone enjoys!

New Year : New Projects

Well, hello again. It's been a while. I apologize.

One of my resolutions for this year will be to finish more projects.. and boy do I have a pile of nifty things to revamp!


To-Do List:

  • Share images from Double Desk project.
  • Metal Rolling Cart into Planter/Storage.
  • Ornate Telephone Table re-vamp.
  • Three Small Stools Makeover.
  • Ceramic Pillars into.. ??
  • Main Bath Renovation.

I'm running out of room to keep all my cool stuff, perhaps I will start selling them.


Next post, coming soon!

Monday, April 23, 2012

Rustic Farmhouse Table

Hi all! I know it's been quite a long time since I have posted, but teaching has been taking up much of my time and mental capacity lately. I look forward to more posts in the next couple months (summer vaca)!!

This is our newest build. A rustic farmhouse style dining room table. A little back story first: when we first moved into our house we had a el-cheap-o IKEA 4 person table (with chairs pictured). Don't get me wrong, I love me some IKEA, but this table was dinky. After about a year, we received a hand-me-down table, which was the exact opposite: huge, real wood, ginourmous. This was great, except it was super wide, which made trying to walk around it while others were dining almost impossible. 

What I really wanted was a farmhouse table. The cost? $800.00+. My budget? $200.00.
Solution? MAKE ONE!

After searching the Internets, I came across this plan from Ana White. 
We decided to alter the length, and leg type, choosing 4x4's instead for a more sturdy look.

We have never built anything from scratch before, so it was intrimdating at first. But, after using my handy graph paper for my visual brain, the shopping and cutting were a breeze.


We choose Pine Select Boards from Home Depot. This was the most expensive wood available, however it provided the least warping for us beginners. Using less expensive wood would have added more of a rustic feel though. The legs we had to purchase from Lowe's, as non-pressure treated 4x4's are hard to come by. They are Fir, but were similiar in tone.


Here is just a breif play-by-play of our experience. For specifics, please visit the link above.


Framing Up Apron & Screwing Boards
*tip: lay out your planks for the top before hand. Number and flip correctly to achieve your desired effect. 

Flip & Screw in Apron:
 
I sanded the top and legs separately for the sake of ease. Then screwed in the legs.

The longest part of this project was the staining. One coat of Charcoal Grey from Minwax, and two coast of Satin Polyurethane. The Grey turned out pretty blue, but we still loved the color!


 A close up of the stain:

And Ta-Da! A brand new table!


This cost me just around $200 bucks, a good part of my weekend, but valuable learning and creating time. 
We really like the pop of color. We were on a wood tone overload with wood-on-wood-on-wood, floor, paneled wall, and brown table. Now some blue to add! We can also fit 8 comfortably with room to walk around!

Please feel free to ask any questions about certain steps. And, don't be afraid to build! 

Till next time, friends. 


Wednesday, January 4, 2012

Picture Frame Jewelry Holders


(Disclaimer: My not-so great digital camera stopped working, so all picture were taken with my phone. Sure wish the great ones weren't so co$tly!) 

These jewelry holders were made as Christmas presents for my sister, mother, mother-in-law, and a few aunts. Two of them aren't in the picture. 

I don't have step by steps, but I can break it down pretty quickly. I choose to do this project because my family are jewelry fanatics, with my mom and aunts doing a lot of their own beading. There is never enough room for all the jewelry one girl can own!

The netting in the middle is to hang earrings, and the hooks on the side and the bottom are for necklaces and bracelets. 

The frames picture frame from The Salvation Army. I ended up paying around $3-$5 per frame. I would have liked to spend less, but it seemed they only put on the "nice" ones with cutesy pictures in them so they could up the prices. 


I ripped out the insides, pulling all of the staples, removing glass, etc. Clean, sanded, drilled holes for cup-hooks and drawer pulls. The drawer pulls are awesome and from Jo-Anns. I got them at least 60% off, good deal. I put the cup-hooks in before I painted, to ensure a uniform color.


Good old spray paint, quite possibly my favorite household item. Spayed a few super shiny black, and a few a pearl-like (I had to paint one of the frames white first, then the pearl coat). 
After they were dry, I bought screen-door screen. Used my trusty staple gun, and stapled to the inside of the frame. Not to the flush back side, or you will not be able to hang your earrings.

The hardest part was the drawer pulls. The screws they came on were super long. We had to drill a second, larger hole over the back of the first hole to be able to countersink the nut to hold the screw in. My husband helped by using some power tool to cut off the ends of the screw as flush as possible. Then we put the washer/nut combo in, put a little glue over it to be safe, and covered it with a little felt circle just in case there is any pokey parts.


I also added a frame hook on the back, so they will hang on the wall, just like a normal frame, and added a few cute buttons and do-dads to match the color scheme to one corner!

Again, I apologize for the awful photos, and not having a step by step. I think they are cute, and if you need any more instructions, feel free to contact me!

Here is a picture of the one I did for my sister, via text message. I love the drawer pulls on this one!

Happy Crafting!

Monday, December 5, 2011

Hanging Hemp Lamp


Moral of this DIY: taking a photograph of a light is extremely difficult, and almost impossible to document the true ambiance of the piece! 

This project was inspired by this West Elm light, and I am not the first person to blog about it! From the research I have been doing, this airy light cost around $80! holy moly, not here, hunny!

This took me about 3 hours in total (not including dry time), which is not that bad considering the cost saving and the pride of constructing a useful home item!  
What would look really nice also, is a grouping of these lights in different sizes.. maybe down the road..

Here's the breakdown of the cost:

Light kit from IKEA:                 9.99
Large Ball (16in Diameter)       3.99
800 Feet 20lb Hemp Cord        6.00  (Coupons from Joannes!)
1 bottle Clear Tacky Glue        2.50
Drop Cloth                                  0
Rubber Gloves                             0 
Total:                                   $22.50
Instructions
Prepare. Layout some type of drop cloth. Squirt glue into container. Put on rubber gloves (I'm not afraid of a mess, I went without for the sake of ease). Open all packages. 

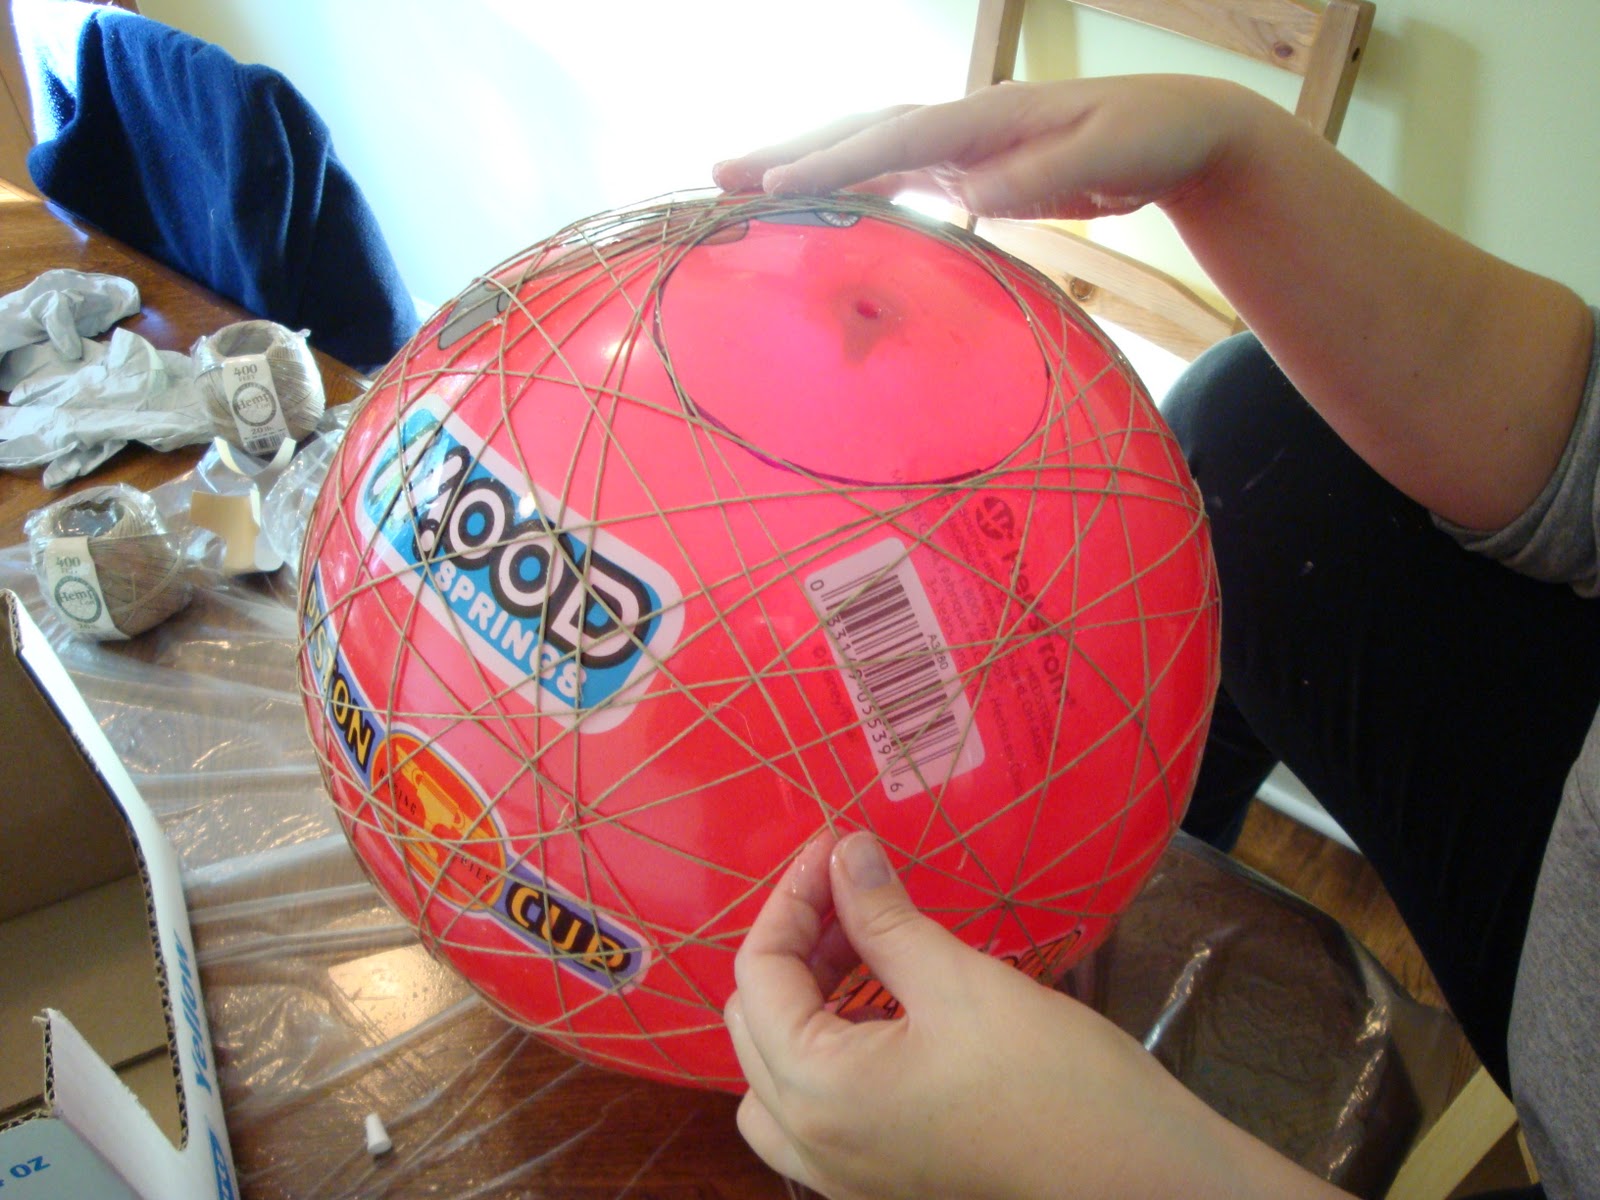
Trace the largest part of your light kit shade (or just make a circle if using a bulb kit only) onto the ball.
Wrap it up! This is the messy part, and bloggers had different opinions about what works best. My method was this: grab some glue with one hand, run it along about 12 inches of hemp, place it on ball. Wrap, Repeat. Avoid circle! Do not cut the string, just keep pulling if off the spool.

And some more wrapping...


It's up to you how dense you want it. I still wanted a lot of light to come through so I stopped after 800 ft of string. 

This is what took the most time, about an hour for each spool of hemp. And my back hurt, bad. So there was a lot of switching position to find what worked best. 

After you are done wrapping LET IT DRY. I let it dry for about 18 hrs, but it will depend on the humidity and how much glue you applied. 

Time to take out the ball. My 7 year old cousin would be appalled at the sight of deflating his favorite cartoon. So, don't let the kids see, or get a hold of the ball and try to bounce your lampshade! 

  
I just used a pin and punctured the ball, I supposed you could use a basketball pin to deflate, then inflate again for future use. To me, it wasn't worth it.

It will slowly pull away and should remain intact if you let it dry long enough. 


Now, just assemble the light kite inside, with the hole at the bottom. Hang, and ENJOY!

Note: There will be clear glue still on shade. I tried to punch some of it out, but it was just too hard. You can't really see it unless you look at it super close, and really, it doesn't distract from the lamp. 

Again, NOT easy to take pictures of a light - at least with my cheapy cam. (hint hint hubby)

I also love the shapes that it creates on the wall. 


Tuesday, July 5, 2011

Anniversary Banner


My parents 30th wedding anniversary is right around the corner. Trying to think thrifty, I started brainstorming some decorations that I could make with materials I already owned. Two bloggers inspired this one, the famous Young House Love, and a super crafty high school classmate/teammate Delicious Paper Design. There are many great artists doing this super cute banners, so I thought I'd give it a  try.

Note: I didn't have a wall in my house long enough to display it properly, I'll have to wait for the party to take a picture where my parents have a large wall perfect for my length!


Instructions:

1. For those already familiar with the crafting field, look around your (what I assume is large, like mine) collection of miscellaneous craft paper. It just so happens that the same pack of craft paper I used for my wedding invites had the color theme my mom picked out, greens and blues. This pack was on clearance for $5 over three year ago. It just keeps on giving, not only did I make about 120 wedding invites (invitations, info, reply cards, map) out of it, but also the wedding programs, signage, miscellaneous decorations, and now this banner. And it's still not empty!


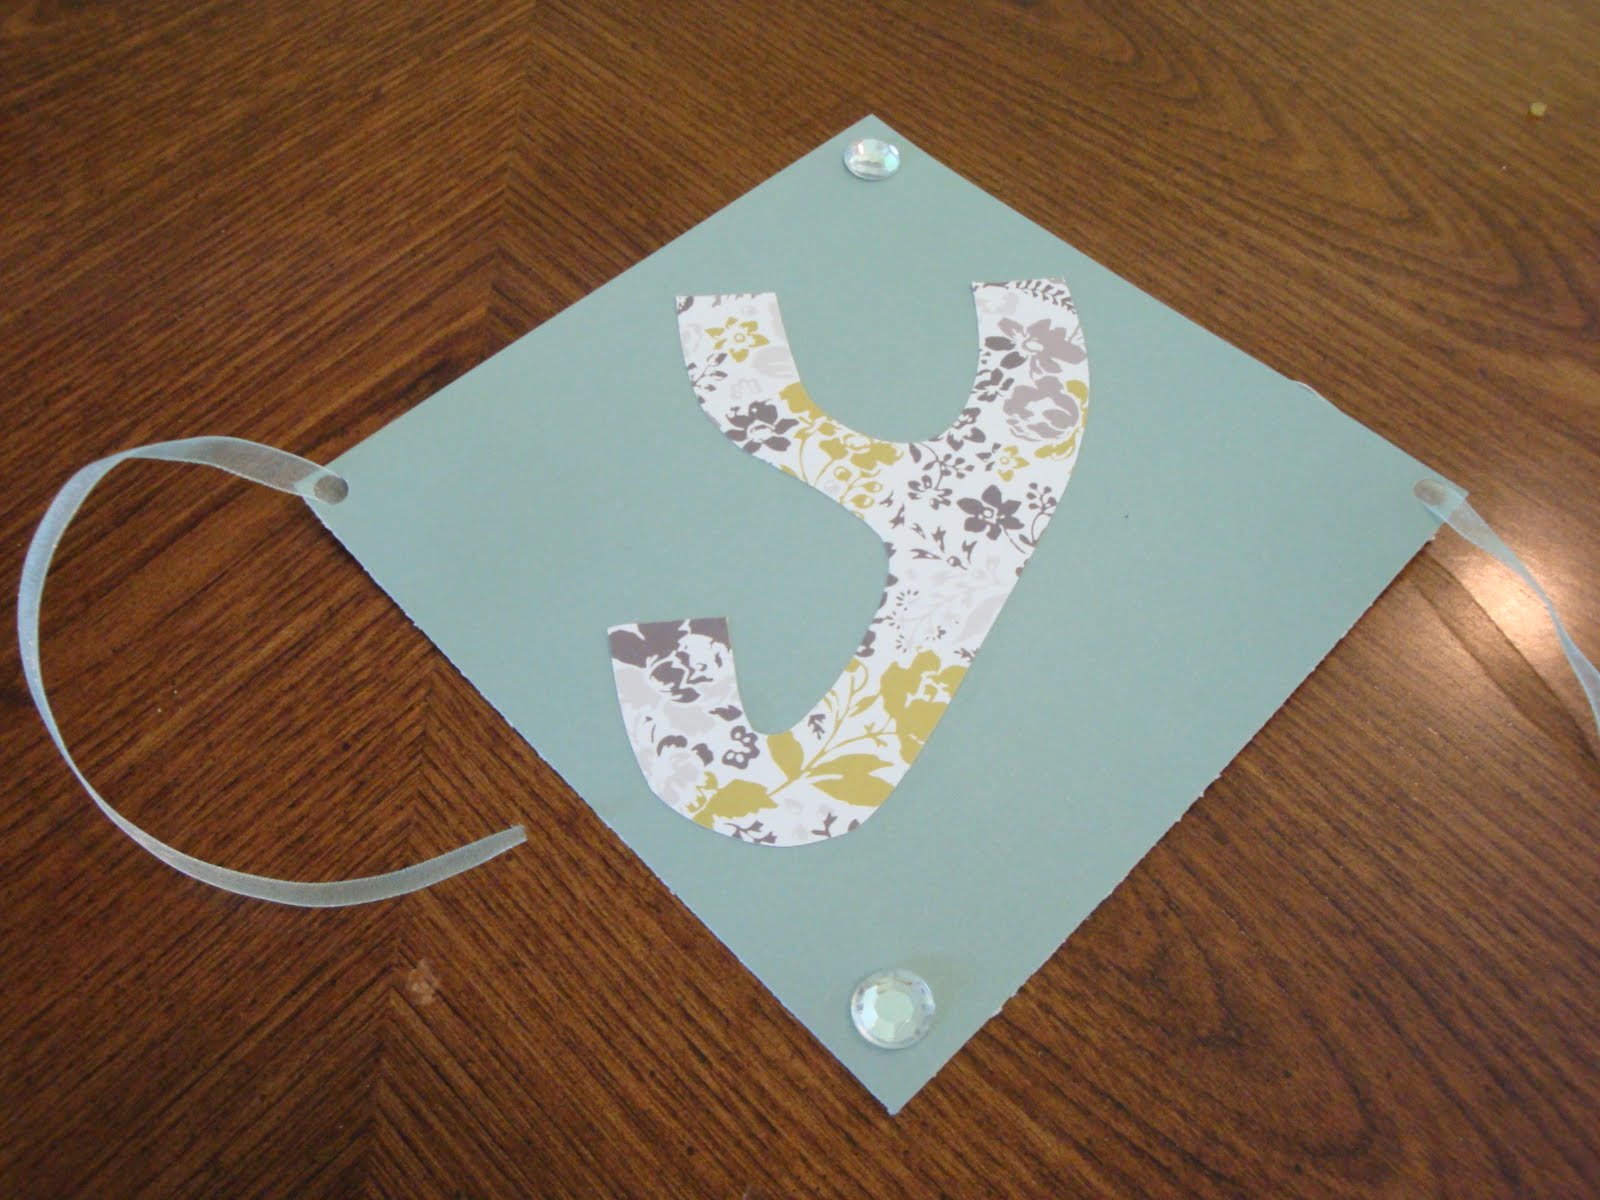
2. The paper is 12in x 12in. One sheet allowed me four 6in x 6in squares. With the amount of letters (16), that worked out to only 4 sheets of the background diamonds. I chose two different colors to alternate. I used my cutter to get exact measurements. I choose diamonds (squares) because this was my frist time and seemed the easiest measurement-wise. For those of you with Cricuts, the possibilites are endless!


3. After I cut 16 squares for the background, I looked through my paper pack and found two patterns that would look nice with the colors already chosen. I also cut those into 16 squares to help with letters later. 


4. This is the step I forgot to document with my camera, sometimes us crafters just get on a roll and forget to stop! 

   Lettering:
1. Spell out all words on a scrap paper first, ya never know! 
2. If you don't feel confident free-handing the letters, there are many stencils available online to print out.
3. Lay out your paper as you will be cutting them, especially if you are alternating patterns/colors. 
4. I suggesting flipping the paper over and sketching the letter on the back, BACKWARDS. If this seems difficult, draw it normally on some looseleaf and attach it to your paper with a paperclip and cut through both. 
5. When you have a duplicate letter (ex. three a's), stack your craft paper and clip together before cutting.
6. Continue on, but be diligent about checking your alternating colors so you don't mess up. In my case, I didn't have any extra paper so it was not an option! 
7. Use a hole punch to create the space for the ribbon. (A cool shape would be sweet!)


5. Gluing letters: I'm sure there are many great craft glues out there, but as an Art Teacher (well, an unemployed one as of late), Rubber Cement is the best economic option for glueing PAPER TO PAPER. It is not water soluble so unlike white glue, it doesn't leave your paper all wrinkly, AND it dries clear and can be rolled off when it dries. Another advantage is that is is reposition-able, so if you can play around with your layout before it completely dries. 

Housekeeping tip: Use an old magazine for your glue station. Once a page becomes gluey, flip to the next to ensure rubber cement doesn't make its way everywhere!


6. After glueing all the letters I added a little bling with some cheapy glue on rhinestones. I plan to hang this outside (weather permitting) and I hope it catches the sun. 


7. One again, layout your letters and any extra elements you have to add to the banner. I added a green heart in between the two words. Another preparation tip: cut all your tape pieces ahead of time. 


8. Pull out more than enough ribbon for your letters, and string on your last letter, first. 


9. Pull the ribbon through and leave a long tail for hanging. To keep equal distance between letters, find something to measure on, or use a ruler. I used two lines on my table. Once they are lined up, flip and tape in place. 


10. Continues with all your letters (check spelling along the way!), and ta-da! A home-made banner!


This project was super cheap. The only additional expenses I had was the rubber cement, ribbon, and rhinestones. Those came to around $8.00, but I did not use them all. In fact, I plan to make some more hanging decorations with "30" on them and use some more of my materials. I will update with pictures from the event in a few weeks to see the banner stretched to its full potential! 

Happy Crafting!