Moral of this DIY: taking a photograph of a light is extremely difficult, and almost impossible to document the true ambiance of the piece!
This project was inspired by this West Elm light, and I am not the first person to blog about it! From the research I have been doing, this airy light cost around $80! holy moly, not here, hunny!
This took me about 3 hours in total (not including dry time), which is not that bad considering the cost saving and the pride of constructing a useful home item!
What would look really nice also, is a grouping of these lights in different sizes.. maybe down the road..
Here's the breakdown of the cost:
Light kit from IKEA: 9.99
Large Ball (16in Diameter) 3.99
800 Feet 20lb Hemp Cord 6.00 (Coupons from Joannes!)
1 bottle Clear Tacky Glue 2.50
Drop Cloth 0
Rubber Gloves 0
Total: $22.50
Instructions
Prepare. Layout some type of drop cloth. Squirt glue into container. Put on rubber gloves (I'm not afraid of a mess, I went without for the sake of ease). Open all packages.
 Trace the largest part of your light kit shade (or just make a circle if using a bulb kit only) onto the ball.
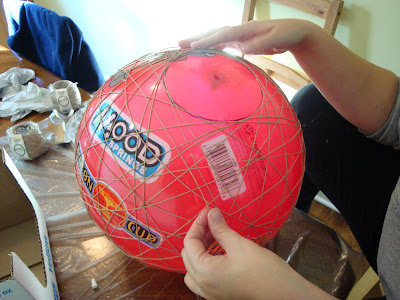
Wrap it up! This is the messy part, and bloggers had different opinions about what works best. My method was this: grab some glue with one hand, run it along about 12 inches of hemp, place it on ball. Wrap, Repeat. Avoid circle! Do not cut the string, just keep pulling if off the spool.
And some more wrapping...
It's up to you how dense you want it. I still wanted a lot of light to come through so I stopped after 800 ft of string.
This is what took the most time, about an hour for each spool of hemp. And my back hurt, bad. So there was a lot of switching position to find what worked best.
After you are done wrapping LET IT DRY. I let it dry for about 18 hrs, but it will depend on the humidity and how much glue you applied.
Time to take out the ball. My 7 year old cousin would be appalled at the sight of deflating his favorite cartoon. So, don't let the kids see, or get a hold of the ball and try to bounce your lampshade!
I just used a pin and punctured the ball, I supposed you could use a basketball pin to deflate, then inflate again for future use. To me, it wasn't worth it.
It will slowly pull away and should remain intact if you let it dry long enough.
Now, just assemble the light kite inside, with the hole at the bottom. Hang, and ENJOY!
Note: There will be clear glue still on shade. I tried to punch some of it out, but it was just too hard. You can't really see it unless you look at it super close, and really, it doesn't distract from the lamp.
Again, NOT easy to take pictures of a light - at least with my cheapy cam. (hint hint hubby)
I also love the shapes that it creates on the wall.


