Wednesday, June 15, 2011

Re-Use Art Work


This is a quick project that I did last summer while we were updating our house.

Side note: I realize that I need to get a new camera to capture my projects better, but that isn't in the budget right now!

Gwen Frostic was a Michigan artist and poet who specialized in wood block prints. I learned about her in college, then one day my mom pulled out a stack of postcards she had purchased when she was younger. They were Gwen Frostic prints! So beautiful, simple and organic. They fit perfectly into the feel of my home.


All of the picture frames were purchased from the Salvation Army. They were all different colors, and I specifically looked for ones with interesting shapes and textures.


Sorry, I do not have any step-by-steps for this one, but it is pretty simple to do.

First, I cleaned all the frames and sanded any shiny or rough ones.

I LOVE SPRAY PAINT! I decided on a shiny black- spray away!

I loved this tiny frame, but I didn't want to cut any of the prints to fit. I found a piece of scrap-booking paper that was in my drawer and had the same vibe.


Project Cost:
Frames: 6 @ ~ $2.00
Paints:              $3.00
Prints:               Free!
Total:               $15.00


I am going camping for a few days, so my next project won't be posted for a little while. I am working on a set of placemats using stenciling and weaving, that's the plan!

Thursday, June 9, 2011

Garage Sale Deal - Cute Bench Makeover


Garage sales are awesome places to find amazing deals. If you don't feel like driving all over town, just take a walk in the neighborhood and hit the ones close by. Today's find: a cute little bench for.. wait.. $2.50! Can you believe that?! Furniture is usually priced higher at rummage sales, but I guess these people just wanted it gone.

It was pretty rough looking, but I saw potential. My immediate plan was to re-upholster and paint it. I have upholstered two headboards for my home, so this little mini cushion was pretty simple, anyone can do it! I might put my headboards up on a later date and share the website I found my instructions from.


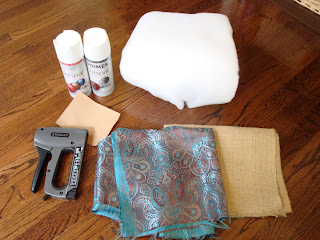
Materials
Non-stretch fabric for covering
Batting
Sand Paper
Primer
Paint (spray or regular, your choice)
Staple Gun
Hammer/Screwdriver


Prepping

1. I unscrewed and detached the seat. I then noticed there were a couple layers of fabric and burlap that were held on by little brad nails. The fabric was pretty wimpy so I was able to pull most off by hand, then use my hammer to pull up as many nails as possible.

2. I ended up having to do some jimmy work with one of the broken springs. A bonus of buying an old house; tons of weird tool/metal items in the basement. I have no idea what these silver things are I found, but they worked to hold the broken spring!


Upholstering


1. I bought more burlap, which seemed to be used over the springs so they would not pinch the batting.

2. Staple the new burlap on the springs.


3. I placed two layers of batting cut to size on top to give my cushion fluff, but not add girth around the edges.  After, I flipped it on top of two layers that were cut bigger than the seat. Depending on the thickness of batting you use the number of layers will change.


4. Staple the four sides and continue, alternating and holding taught the sides of the batting. 


5. Place your fabric right side down on the floor and put the cushion upside down. Repeat same process by stapling and folding corners.


Painting

1. Start by sanding the stand with a not-too-gritty paper. I have no idea what one I used, but it worked. You really need to do this if there is shiny or slick surface, otherwise the paint will not stick well.


2. Use primer! Especially if you plan on using a light color like I did. Otherwise, it will take way too many coats of paint to cover. Here is how the coat of primer turned out:


3. Paint! If using spray paint, you'll probably need 2-3 coats. Make sure to let it dry in between coats so you don't get any nasty runny stuff or bubbles. If using a brush, I would suspect 2 coats would be the most you needs, just make sure to tame any drips before they dry.

4. Let dry completely and re-assemble. Ta-Da! 

Total cost:
                   $2.50 Bench
                   $3.50 Fabric (w/ extra left over)
                   $1.50 Burlap (w/ extra left over)
                   $3.50 Primer
                   $3.50 Paint
                   $  .00 Batting (left over from other project)
                   $14.50

Hello, can't beat that! I really think a bench like this would go for at least $70.00 at a boutique! Make your own and customize it how you want! 


I chose a pretty shinny/exotic fabric. Most of the fabric and patterns in my house are earth tones. I wanted something that would pop, and since it's so small it dosen't look gaudy. The pictures don't do it justice, but it actually changes color depending on the angle you are viewing it from, so pretty!  I suggest trying something new, you can always spend a few more dollars and change it up when you get tired of the current fabric, just staple another layer on! 

Wednesday, June 8, 2011

Thrifty Hanging Baskets


$29.99 for one decorative hanging basket at the big box stores? I think not- not for this gal on a budget at least. I know the ones with the white buckets are less dough, but ugh, they are all just the same and so common.

So, I made my own. It is really simple and if you shop at the right places you can do it very cheaply and personalize it to your own taste/color themes. IT IS EASY, DON'T BE AFRAID! I know they look so fancy at the stores, but it's just like planting in the ground!

I was able to snag the 14inch hanging planters from Big Lots. They were on sale for 2/$7.00. $3.50 each, that's a screaming deal considering the ones I saw at the specialty garden store were $24.00 alone. Granted, they aren't made out of the most high quality metal, but unless everybody that walks by your house touches them, they'll never know. I am a little worried about the weight inside compared to the strength of the chain, so I'll update if there is a giant crash in the near future.

I purchased the plants from English Gardens. Their flats are only $9.99. I only ended up using 4-5 four packs of flowers for each basket. I was able to use the extra around the yard.

I had garden soil left over from the garden, so I just used that. However, now that I think about it, buying potting soil would have made the planter lighter, so you may want to choose that.

I decided to use purple and yellow flowers. Think color wheel. Opposite colors (contrasting) colors give you the most bang for the buck because they enhance and make each other pop. Choose a color on the wheel, the colors opposite of it are the contrasting ones incase you forgot from Grade School art.

Here's how I made 2 baskets:

1. Fill basket about half way with soil.
2. Start with your center flower if you have one, or just start IN the center if using all of the same flowers.
3. Dig out a little hole, plant center flower and fill around with extra soil.
4. Continue around the outside with your flowers. Make it as dense as you like, but remember- the more you add, the heavier your basket will be.
5. Water and hang!

They are so inexpensive to make, and next year your can just buy a new lining and do it again! Maybe think about other combinations that compliment its location.

Total Cost: $8.00 a basket!! Pretty good deal if I say so myself! Plus, it doesn't look like every hanging basket you see, it's original to my taste. Enjoy!